What Are Garage Floor Low Spots (and Why Do They Matter)?

Low spots are uneven dips in a concrete floor that can turn your garage from a useful space into a frustrating hazard. They are much more than just a cosmetic problem.
These depressions can become a serious tripping hazard for you and your family. They also create areas where water, snowmelt, or chemical spills pool. This leads to further concrete damage and creates a perpetually messy environment.
Often, these dips are a sign of bigger issues. They might result from installation missteps, like improper finishing, or from the soil settling beneath the slab over time.
Leaving low spots unaddressed can also affect how equipment sits on the floor. Tool chests, cabinets, and jacks can become unstable and unsafe.
To ensure the safety, longevity, and usability of your garage, it’s essential to fix these low spots. This guide will walk you through the process, turning a problem area into a perfect floor.
Is This a DIY Fix or a Job for a Pro?
First, you must determine if this is a shallow dip you can fix yourself or a deeper structural issue requiring a professional. This initial assessment is the most important step.
Is it a shallow depression, perhaps less than 1/2 inch deep, across a small area? If so, you’re in the right place. This guide focuses on the DIY repair of these manageable, surface-level dips.
However, if a large section of your garage floor is noticeably sunken, a simple patch will not solve the problem. This indicates the entire concrete slab is sinking, likely due to soil issues beneath it.
These larger, deeper depressions require professional help. Experts use methods like polyjacking, which involves injecting polyurethane foam, or mudjacking to lift and level the entire slab from below.
Attempting to fill a deep, structural void with a simple resurfacer will only waste time and money, as the patch will eventually crack and fail. You can learn more about these professional processes from concrete repair specialists at A-1 Concrete Leveling.
What Tools and Safety Gear Will You Need?
A successful repair starts with having the right tools and safety equipment on hand. Proper preparation prevents interruptions and helps you work safely and efficiently.
For cleaning, you’ll need a putty knife for scraping, a strong degreaser, and a stiff bristle brush. A plastic watering can is useful for applying chemical etchers evenly.
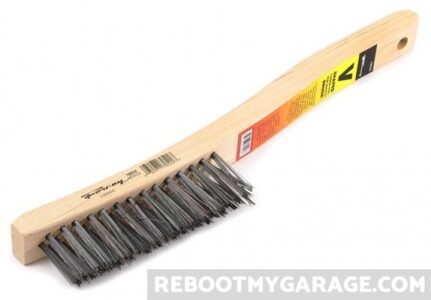
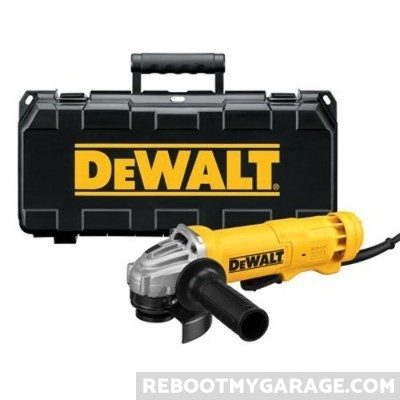
For surface preparation, you will need either a simple wire brush for small areas or power tools. For larger spots, an angle grinder with a diamond cup wheel is necessary.
A powerful garage vacuum cleaner is absolutely essential. It is critical for removing all dust and debris before patching to ensure proper adhesion.
For application, you’ll need a concrete patching product, a sturdy trowel for spreading, and a disposable surface like cardboard for mixing.
Most importantly, put your safety first. Always wear proper Personal Protective Equipment (PPE), including goggles, gloves, and a dust mask, especially when grinding.
Step 1: Why Deep Cleaning Is the Most Important Step
For any patch to last, the concrete surface must be perfectly clean and porous. This is a step you absolutely cannot afford to rush or skip.
Any sealer, oil, grease, or grime remaining on the surface will act as a barrier. This barrier prevents the new patching material from bonding securely with the existing concrete.
A poorly cleaned surface is the number one reason for patch failure. Your hard work will be wasted when the patch chips, peels, or lifts away from the floor.
Start the process by using a simple putty knife. Scrape off any heavy gunk, caked-on dirt, or old paint to reveal the concrete surface beneath.
Once the heavy debris is gone, you must deep clean the area to remove embedded oils and grease. This will create the pristine surface needed for maximum adhesion.
How to Effectively Degrease the Concrete
When it comes to removing stubborn oil and grease, you have a couple of effective options. You can start with a simple DIY method or go straight to a commercial-grade product for guaranteed results.
 The Tide Method: There’s a rumor that NASCAR teams use Tide laundry powder to clean oil. Mix a strong solution of powdered Tide, pour it on the stain, sprinkle more powder, and scrub with a stiff brush. Let it sit for 15 minutes and rinse thoroughly.
 The Degreaser Method: For stubborn stains, a dedicated de-greaser is your best bet. A product like Oil Eater is nontoxic, non-corrosive, and incredibly effective at breaking down heavy-duty grease.
Never leave an embedded oil stain, as it will compromise the patch’s adhesion. Get the surface as clean as possible with a quality oil remover. You can check out Oil Eater on Amazon.
Step 2: Prep the Surface for a Rock-Solid Bond
After cleaning, you must roughen the smooth surface of the low spot. This critical process is called creating a “surface profile.”
Think of it like sanding wood before painting. The coarse texture gives the patching material thousands of tiny points to grip, creating a strong mechanical bond.
A smooth, unprofiled surface offers almost nothing for the patch to hold onto. The patch will simply sit on top and will eventually break free under the stress of vehicle traffic or temperature changes.
You have three main options to create this essential surface profile. You can use a manual wire brush, a mechanical grinder, or a chemical etcher. The best method depends on the size of your repair area and your comfort level with the tools.
Surface Prep Method 1: The Manual Wire Brush

For very small dips and minor imperfections, the simplest approach can often be the best. A stiff wire brush and some dedicated effort can be all you need.
This method is the most affordable and requires no special power tools. It’s a great choice for patching a spot no larger than a dinner plate.
The goal is to scrub the surface vigorously enough to remove any loose material and lightly score the smooth concrete. You want to see and feel a difference in the texture.
While effective for tiny repairs, this method is very labor-intensive. It is not a practical choice for any low spot larger than a square foot or two, as it would be difficult to create a uniform profile.
Surface Prep Method 2: The Angle Grinder

For larger low spots, mechanical grinding is the fastest and most effective way to prep the surface. This involves using an angle grinder with a diamond cup wheel attachment.
For very large areas, you might consider renting a walk-behind floor buffer, also called a floor maintainer, with a specialized Diamabrush attachment for concrete prep.

WARNING: Exercise extreme caution. Angle grinders are powerful tools that can kick back and cause serious injury if not handled properly.
Grinding produces a tremendous amount of fine silica dust, which is hazardous to breathe. Always wear a high-quality dust mask, goggles, and gloves.
To control the mess and the hazard, use a dust shroud connected to a powerful shop vacuum. Be aware that it’s easy to accidentally gouge your floor by holding the tool unevenly.
Learn more about this process from experts like Family Handyman before you start.
Surface Prep Method 3: Chemical Etching

If the thought of using a powerful grinder is too intimidating, chemical etching provides an excellent and much safer alternative for profiling the concrete.
Historically, this was done with dangerous muriatic acid. However, modern acid substitute products are significantly safer and easier to use.
Products like Rust-Oleum Clean & Etch are non-toxic, fume-free, and biodegradable. There is no reason to expose yourself to the health risks of muriatic acid when these modern substitutes work so well. Check it out on Amazon.
To use an etcher, mix it with water in a plastic watering can and spread it evenly over the low spot. Never pour it directly from the bottle in a concentrated spot. Scrub the area with a stiff brush until the solution stops fizzing.
It is crucial that you do not let the etcher dry on the floor. Once the fizzing stops, rinse the area thoroughly with a hose at least three times to neutralize the reaction and remove all residue. A floor squeegee will make this process much faster.
Step 3: Choose the Right Concrete Patching Product
Once the floor is clean, dry, and properly profiled, you’re ready to select your patching material. This is not the time to use leftover regular concrete mix.
You cannot fix a concrete low spot with regular concrete; it’s not designed to bond or cure properly in thin layers. You must use a dedicated concrete patching or resurfacing product.
I like the Rust-Oleum Concrete Patch & Repair Kit. It’s a two-part epoxy formula that is extremely strong, durable, and ideal for filling low spots up to 1/2 inch deep.
For depressions deeper than half an inch, you may need to apply a self-leveling underlayment first to fill the bulk of the void, then finish with the epoxy patch.
This product dries to a durable, gray finish that can be driven on or coated with paint or an epoxy system after just 8 hours. It is designed specifically for the kind of tough repairs your garage floor demands. You can get the Patch & Repair Kit online.
Step 4: Apply the Patch for a Level Finish
With your surface prepped and materials ready, it’s time to apply the patch and level that low spot for good. Always plan your exit path so you don’t trowel yourself into a corner!
To begin, you will need a disposable surface like cardboard for mixing, a sturdy trowel, and some rubbing alcohol to clean your tools afterward.
Follow the package instructions carefully. For a two-part epoxy like the Rust-Oleum kit, you’ll mix the two components thoroughly until you have a uniform consistency.
Work quickly, as these products have a limited working time or “pot life” before they begin to harden. Use your trowel to spread the mixture over the low spot.
The key to a seamless repair is to “feather” the edges. This means using your trowel to create a thin, smooth transition from the patch to the surrounding floor, ensuring there is no abrupt edge.
Continue to work the material until it is level and smooth. Once it has cured according to the instructions, your floor will be level, safe, and ready for use. Have a look at the Patch & Repair Kit here.
Step 5: Cure the Patch and Plan Your Next Upgrade
You’ve cleaned, prepped, and patched the low spot. The final step is to allow the repair to cure properly, ensuring a durable and long-lasting result.
Curing time is critical. The Rust-Oleum kit, for example, is ready for foot traffic and can be painted or coated after just 8 hours, which is remarkably fast.
During the cure time, avoid walking on the patch, and be sure to keep the area dry. This allows the chemical reaction to complete, creating the hardest possible surface.
Once cured, you can be proud of your flat, safe, and functional floor. You have successfully eliminated a hazard and improved the value and utility of your garage.
This is also the perfect opportunity for your next garage improvement. With the floor now perfectly level, consider applying a full epoxy coating or a durable concrete paint for a uniform, professional, and easy-to-clean finish across the entire space. Your garage is now a blank canvas.


